
How to create an agent within Microsoft 365 with proprietary knowledge sources for answering questions
In every organization, knowledge lives in scattered places — tucked inside PDFs, SharePoint folders, policy manuals, and the collective minds of employees. The problem isn’t a lack of information; it’s the daily friction of finding it. That’s where creating a custom chatbot for your business powered by your company’s proprietary knowledge becomes transformative. Instead of digging through folders or pinging colleagues for answers, employees can simply ask: “What’s our policy for client data retention?” or “How do I reset the field service tablet?” and get an instant, accurate reply drawn directly from the organization’s verified sources.
This kind of system doesn’t just save time; it elevates the reliability of information. By connecting the chatbot to internal documents, you ensure that every answer reflects the company’s latest guidance — not the internet’s best guess. Microsoft’s Copilot Studio makes this easier than ever, allowing you to build custom agents that understand your domain, your language, and your processes. Think of it as creating your own ChatGPT — except it knows your business.
It’s worth noting that Copilot Studio agents are, by design, internal tools. They live inside your Microsoft 365 environment and are accessible only to authenticated users within your organization. That limitation is intentional — it keeps sensitive company data secure. While Microsoft is gradually expanding options for public-facing deployment, the real power today lies in using these custom copilots to boost efficiency, reduce knowledge bottlenecks, and centralize institutional wisdom safely behind your firewall.
In this post, we’ll walk through how to create a custom LLM-based agent using Microsoft’s Copilot Studio, upload your proprietary knowledge documents, and configure it to answer real business questions with authority — effectively turning your company’s documentation into a living, conversational assistant.
What you’ll build
A Microsoft agent that references internal/proprietary knowledge sources when answering questions.
Prerequisite: Microsoft Office 365
Step-by-step
1. Create Your Custom Chatbot Agent
In Microsoft’s Office 365, click on the ‘Create agent’ link located in the left-hand menu bar:

The two-panel Agent configuration window will appear:
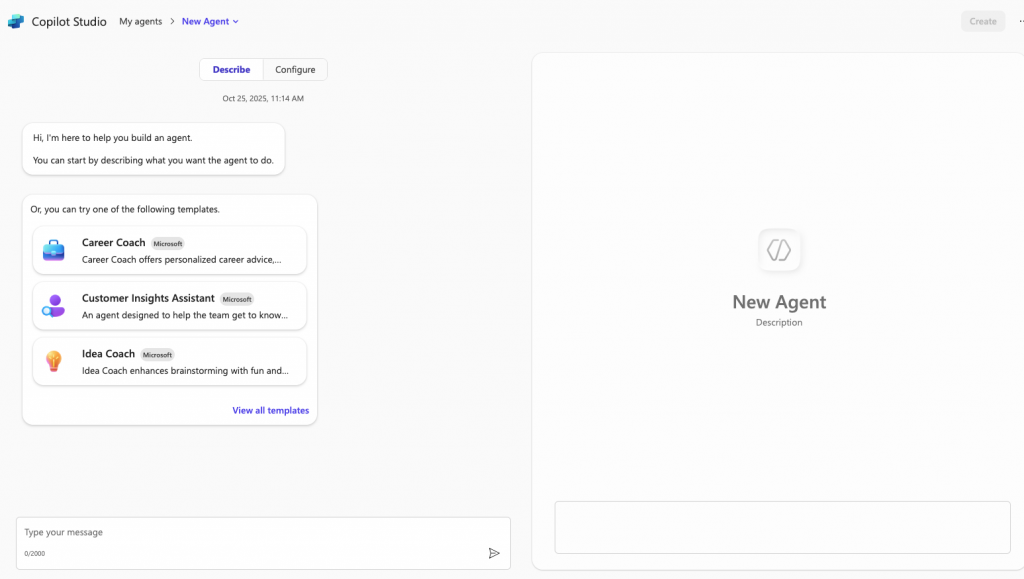
On the left side is the Describe tab. Entering information into this tab will allow Copilot Studio to do some automatic setup behind the curtain. Here you can tell Copilot in natural language what kind of agent you want to build. Think of it as the agent’s “origin story.” You can start by typing a natural-language description (“I want an AI that answers customer service questions from my company’s manuals”) or select a template from Microsoft’s starter options, such as Career Coach, Customer Insights Assistant, or Idea Coach. Each template comes preloaded with example intents and tone settings, which can save time if your use case fits a common pattern.
Entering information into the Describe tab isn’t mandatory, but it’s like having an AI co-designer for the first five minutes. Entering even a one-sentence goal (“Build an agent that answers technical support questions from my company’s service manuals”) can prime the system with an initial personality and intent structure. Skipping straight to Configure gives you a blank slate — ideal for advanced users who prefer full creative control, but slightly more work for beginners.
The right side of the interface is a workspace preview for the agent that serves as a design canvas that will gradually fill in as the agent is configured. Later, as knowledge documents are added and additional instructions are given, it becomes a workspace where you can test and refine the agent’s behavior.
2. Configure the agent
Click on the Configure tab (just beside Describe). This is where you’ll complete the configuration and link your proprietary knowledge documents — PDFs, manuals, spreadsheets, or databases — so your custom LLM can answer questions using real company data rather than generic web knowledge. Here’s where you can make your agent shine with insider expertise.
The Configure tab initially looks like this:
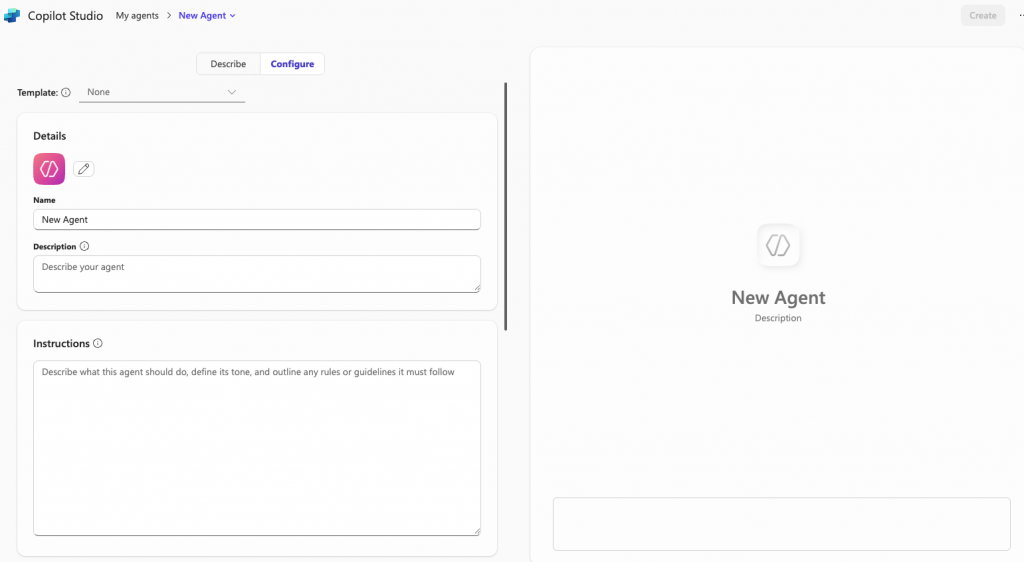
On the left-hand side of this screen, you’ll see three main sections that matter most:
Template Dropdown
At the very top, you’ll find the Template option. If you selected one earlier (like Career Coach or Customer Insights Assistant), you’ll see it listed here. Templates act as preconfigured blueprints that come with example intents and tone settings. Choosing None gives you a blank slate — ideal for building a fully custom agent powered by your company’s documents and internal data.
Pro Tip: If your use case is highly specific — such as a compliance advisor or technical support agent for internal systems — start with “None.” This avoids baked-in behaviors that can conflict with your proprietary content. Templates are best for quick prototypes, not precision builds.
Details Panel (Name and Description)
This is where your agent’s public identity takes shape.
- Name: The title your users will see when they interact with the chatbot. Choose something meaningful — for example, Legacy Edge Knowledge Assistant or HR InfoBot.
- Description: A one-sentence summary that tells users what the agent does. This description also guides the underlying model: it acts as metadata to prime its understanding of its domain and purpose.
- Icon: Click the pencil button to change the icon that is shown for the agent.
Pro Tip: Before writing your agent’s description, spend a few minutes crafting a mission statement in plain English — one or two sentences that describe what your agent should know and how it should respond. Write the description as if your’re briefing a new employee. The clearer the description, the sharper the responses. Keep the description under two sentences and use active verbs (“provides”, “retrieves”, “summarizes”). This helps both Copilot Studio and human users instantly understand the agent’s scope — and prevents it from over-generalizing into unrelated areas.
Instructions Panel
This large text field is the most powerful section — it defines how your agent thinks and behaves. Here you’ll describe:
- What the agent should do
- How it should sound (professional, conversational, technical, etc.)
- Any rules or boundaries it must follow
In essence, this is your agent’s system prompt — the foundational guidance the LLM (large language model) reads before interacting with users. Microsoft calls this “Instructions,” but think of it as the “mission script” for your AI.
Example:
“You are an internal support assistant for Legacy Edge. Your job is to answer employee questions using official company knowledge documents. Always cite the relevant document when responding. If a question is outside your scope, respond: ‘I don’t have that information available internally.’ Maintain a helpful and factual tone.”
Pro Tip: Treat the Instructions like programming logic written in plain English. Every word affects how the agent behaves. Avoid vague directions like “Be smart and friendly.” Instead, define purpose, style, and boundaries clearly — especially when the agent handles proprietary data.
What Happens Next
Once you’ve completed these fields, you’re ready to click Create in the top-right corner. That’s the moment when Copilot Studio actually instantiates your agent — giving it a workspace and enabling the right-hand chat window for live testing. From there, you’ll move on to uploading your internal knowledge documents and fine-tuning how the agent retrieves and summarizes information.
Note: if you click an option that takes you away from the configuration screen after the chatbot has been created, you can always return to the configuration screen by clicking the three dots next to the name of your chatbot (your new chatbot should appear in the left-hand menu under ‘Agents’) and selecting Edit.
3. Add knowledge sources
Once your agent has a name, description, and behavior defined, it’s time to give it something to know. The Knowledge section is where you connect your internal data sources — the documents, files, or URLs that the chatbot will draw from when answering questions.

When you click inside the Knowledge field, you’ll see two main options:
- Upload or link content directly, such as PDFs or Microsoft Office files.
- Reference existing online sources, such as OneDrive, SharePoint, or public URLs.
Each approach has its strengths, and the best option depends on how dynamic your information is.
Uploading Files Directly
Uploading files gives your chatbot a static snapshot of the knowledge at the time of upload. This is ideal for material that doesn’t change often — things like standard operating procedures, troubleshooting guides, or technical reference manuals.
- Pros: Simple setup, fast ingestion, no dependency on external systems.
- Cons: You’ll need to re-upload documents when content changes.
Linking to OneDrive or SharePoint
Referencing cloud-based storage (OneDrive or SharePoint) lets your Copilot dynamically access the latest versions of those files. This is the better choice if your documentation is frequently updated by multiple teams.
- Pros: Always current, centralizes updates, ideal for shared corporate documentation.
- Cons: Requires consistent access permissions; if the file is moved or renamed, the link breaks.
Pro Tip: When you upload files directly, those documents are ingested and indexed locally and pre-processed into searchable text embeddings that are optimized for retrieval. This will result in faster response times (by one or two seconds.) Usually a hybrid approach is best — upload your static core documents that do not change frequently (SOPs, policy documents, troubleshooting guides) and link dynamic resources like “Known Issues” spreadsheets or service logs stored in SharePoint.
What Types of Documents Work Best
Copilot Studio supports a variety of document formats, but not all files are equal in usefulness. Here’s how they stack up:
- PDFs: Excellent for finalized procedures, policies, and manuals. They preserve layout and structure, making them easy for the model to parse.
- Word Documents (.docx): Great for technical explanations, onboarding guides, or FAQs. They’re readable and editable, so you can easily update knowledge content.
- Excel Spreadsheets: Useful for structured data — such as error code lookups, pricing matrices, or configuration values. However, keep them simple; the model reads cell text, not formulas or visuals.
- PowerPoint Files: Fine for summarizing visuals or presenting workflows, but only the text portions (titles and speaker notes) are parsed.
- URLs: Handy if your company hosts documentation externally (like a support portal or documentation site). Be sure the pages don’t require authentication; Copilot can only read public URLs.
Pro Tip: Avoid uploading raw exports, complex tables, or engineering drawings. Instead, upload or link documents that explain those materials in text — for example, a “Product Configuration Reference Guide” is far more useful than a schematic file with no context.
Choosing the Right Knowledge Sources
When deciding what to feed your Copilot, prioritize documents that provide context and clarity. Good knowledge candidates include:
- Standard Operating Procedures (SOPs) — Yes. These are gold; they define the official way things are done.
- Employee Manuals — Only if your chatbot handles HR or policy questions. Otherwise, they clutter the knowledge base.
- Technical Specifications — Excellent if they contain plain-language explanations and troubleshooting details.
- Product Catalogs — Useful for sales or support bots, but less valuable if they’re mostly images or SKU tables without text descriptions.
- Drawings or Engineering Blueprints — Generally not effective; the model can’t interpret images or CAD formats.
Pro Tip: Before uploading, skim each document and ask, “Would I hand this to a new hire to help them solve a problem?” If the answer is yes, it probably belongs in your chatbot’s knowledge base.
Prioritizing Knowledge Sources
After adding your files or links, toggle “Prioritize the knowledge sources you added for agent knowledge-based queries” to on. This instructs the agent to rely on your internal content first before using its general reasoning abilities — a crucial setting for keeping responses accurate and aligned with company policy.
Once your documents are added and prioritized, your Copilot now has a mind of its own — filled with Legacy Edge’s proprietary knowledge, ready to deliver accurate, document-sourced answers.
Pro Tip: Keep your uploaded documents clean and well-labeled; Microsoft’s ingestion process works best when file names and content headers clearly reflect the topics they cover. Think “Product_FAQ_June2025.pdf” instead of “final_v3_reallyfinal.pdf.”
Enabling Capabilities and Suggested Prompts
Once your knowledge documents are connected, scroll down to the Capabilities and Suggested Prompts sections. These settings shape how your Copilot processes information and how users interact with it.
Capabilities
The Capabilities section controls the advanced tools your chatbot can use. Currently, Copilot Studio offers two main options: Code Interpreter and Image Generator.
Code Interpreter
When this option is enabled, your agent can perform lightweight calculations, analyze data, or process snippets of code. For technical or engineering environments, this can be incredibly useful — for example, parsing error logs, formatting configuration strings, or doing quick math related to system parameters.
- When to use it: Enable it if your chatbot will handle any queries involving formulas, data analysis, or troubleshooting automation scripts.
- When to skip it: Leave it off if your agent deals strictly with procedural knowledge or policies (it adds no benefit to general knowledge lookup tasks).
Example query that would need Code Interpreter:
User: “What’s the average system response time if server A reports 310ms and server B reports 270ms?”
EdgeAssist: “The average is 290 milliseconds.”
Pro Tip: Activating the Code Interpreter doesn’t make the agent a full Python environment — it’s more like a quick analytical assistant. Keep it on for demos involving data-driven reasoning, but test responses carefully before deploying it to production.
Image Generator
Turning this on allows your Copilot to generate simple images — useful in creative or presentation contexts. For an internal technical support bot like EdgeAssist, it’s not essential, but you might enable it to demonstrate how Copilot can illustrate workflows, diagrams, or UI steps.
- When to use it: Helpful for documentation, onboarding, or training use cases.
- When to skip it: Disable for performance-critical technical support bots — image generation can add unnecessary complexity.
Suggested Prompts
The Suggested Prompts section helps guide users by showing examples of what they can ask the chatbot. Think of this as a built-in conversation starter menu — especially helpful for new users who aren’t sure what to type.
When you click “Add a suggested prompt,” you can pre-fill several example questions. These prompts don’t just improve usability; they quietly teach your users the kinds of queries your chatbot is designed to handle.
Examples:
- “How do I fix a timeout error in the automation module?”
- “What are the steps to reset a client’s API key?”
- “Where can I find the latest release notes for the analytics engine?”
- “What causes a configuration mismatch during deployment?”
Pro Tip: Use this feature like a mini onboarding experience and show a variety of uses. For example, include one prompt that demonstrates the agent’s range (“Show me how to configure a new client system”), one that shows its precision (“What’s the fix for error code 421?”), and one that shows its ability to answer an often-asked non-technical question (“What should I do if documentation doesn’t cover a client issue?”).
The Suggested Prompts appear when users open a new chat, reducing the learning curve and encouraging meaningful engagement from the start.
Wrapping Up This Step
The Capabilities and Suggested Prompts features may seem small, but they’re what turn a static assistant into an interactive teammate. Enabling capabilities extends what your Copilot can do, while thoughtful suggested prompts guide users toward what it should do best.
At this stage, your internal chatbot can reason, retrieve knowledge, and communicate clearly with your team. The next step is deployment: deciding where employees can access it (in Teams, on your internal portal, or embedded within your support dashboard).
3. Share the Agent
Once you’ve configured the Agent’s knowledge, capabilities, and prompts, it’s time to make it available to your team. Publishing in Microsoft Copilot Studio is straightforward, but understanding the access options ensures your chatbot stays secure and reaches the right audience.
Publishing the Agent
At the top right of the configuration screen, you’ll see the Publish button (or Update, if you’ve already published once). Clicking this triggers Microsoft Copilot Studio to build and deploy your agent inside your Microsoft 365 environment.
Once published, your chatbot is ready to use — but by default, it’s internal only. That means it’s available to authenticated users within your Microsoft Entra (formerly Azure Active Directory) tenant.
After publishing, you can access your deployment options under the Share button (next to Update).
Sharing Options
When you click Share, Copilot Studio will show you several ways to make your agent accessible:
1. Microsoft Teams Integration
This is the most common deployment path for internal copilots. With a single click, you can add EdgeAssist to your organization’s Teams environment. Users can chat with it just like they would with a colleague — perfect for quick troubleshooting or referencing technical documentation mid-meeting.
- Pros: Frictionless access; no separate login; easy for employees to adopt.
- Cons: Limited visibility outside Teams unless embedded elsewhere.
2. Web App Access
Copilot Studio also lets you deploy your chatbot as a standalone web app — a simple, branded chat interface your employees can access via a unique URL.
- Pros: Works anywhere within your organization; easy to bookmark or embed in an internal support portal.
- Cons: Still requires Microsoft login; cannot be accessed anonymously by external users.
3. Embedding via Power Pages or Internal Websites
For a more integrated experience, you can embed your chatbot directly into your company’s intranet or Power Pages site using an iframe or web component provided by Microsoft.
- Pros: Seamless integration into existing systems or dashboards.
- Cons: Requires Power Platform permissions and possibly some admin setup.
About Public Access
At this time, Microsoft Copilot Studio is designed primarily for internal copilots. That means public, anonymous access is turned off by default. While Microsoft has begun rolling out limited preview features for anonymous sharing, most organizations (especially those handling proprietary data) will want to keep this feature disabled for security reasons.
For demonstration or testing with external partners, you can manually invite specific Microsoft accounts with limited permissions — just make sure those users are added as “guests” to your tenant.
Pro Tip: Keep your first deployment internal. Once your team has used the chatbot and verified that responses are accurate, you can later publish an external-facing version (for clients or website visitors) using Microsoft Power Pages with controlled access.
Verifying the Chatbot
After publishing, click New Chat in the right-hand preview pane to test it in action. Ask a few real-world questions drawn from your uploaded knowledge base to confirm:
- It retrieves the correct documents.
- Responses are accurate and concise.
- The tone and scope align with your “Instructions.”
If any answers seem off, go back to the Configure tab, adjust the instructions or add more knowledge sources, and hit Update to republish. You can iterate as often as needed — each publish creates a new version that instantly replaces the old one.
Pro Tip: If the chatbot returns wrong information, chat with it until it realizes and admits that it made a mistake. If it doesn’t offer a reason why it made the mistake, ask it to explain why it made the mistake. Then ask it “Give me the exact instruction statement that I should add to this Agent’s Instructions so that this mistake never happens again.” Then, add this statement to the Agent’s instructions, Update it, and test it with more questions to confirm that the additional training statement helped the chatbot to be more accurate. Continue this pattern until the chatbot’s responses are acceptable.
Wrapping Up
Publishing marks the transition from design to deployment — from blueprint to working AI teammate. Whether it lives in Teams, on your internal portal, or embedded in your support dashboard, your custom chatbot now becomes a living resource: a searchable, conversational layer on top of your company’s collective expertise.
Your next frontier? Expanding the chatbot’s role — connecting it to workflows, integrating it with service tickets, or even giving it multi-agent collaboration powers to route complex client issues automatically.
Leave a Reply